In this article, an additional “Appointment” field is created under the “Additional Information” tab and included in the search results. You can use this field to specify a URL where users can create an online appointment.
If you want to include data from a custom field on the single store pages, then create the metabox field, and continue with this article.
All code used throughout this article needs to go in the functions.php inside your active theme folder.
Before you can enter custom data in the “Store Details” section, you first need to create the extra field with the wpsl_meta_box_fields filter.
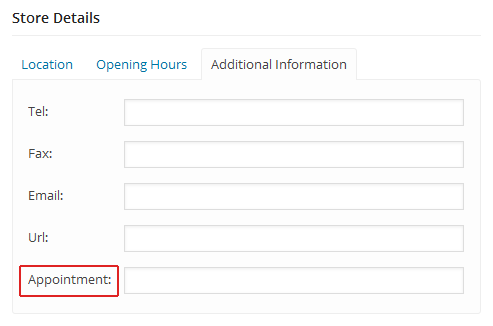
In this code example, the “Appointment” field is added at the bottom of the “Additional Information” tab.
Because no “type” is specified for any of the fields, they will all default to “text,” which means they will render as text input fields. You can see an example of the supported field types in the usage section of the wpsl_meta_box_fields filter.
Place the above code in the functions.php in your theme folder, reload the page, and the “Additional Information” tab should look like the image below.
If you’d like to place it under a new “Appointment” tab, then you can use this code:
Include the Custom Data In the JSON Response
After you created the “Appointment” field, you”ll need to include the custom data in the JSON response before you can access it in the templates.
The following code shows how to include data from the “appointment_url” field in the JSON response:
When store data is saved with update_post_meta, it automatically prefixes the meta key with wpsl_, so data from the “appointment_url” field is accessible under the “wpsl_appointment_url” key.
The value of the name field is the key under which the store data is accessible in the JSON response. You can use whatever you want, but it has to be unique.
The type field is used to make sure the data is sanitized properly. In this case, it’s set to url, so it uses esc_url to sanitize the URL.
There is support for four different field types:
email
url
textarea
text
If no type is specified it will default to text and use sanitize_text_field to sanitize the data.
Show the Metadata on the Frontend
In the last step, the custom data is included in one of the templates.
Use the wpsl_listing_template filter if you want to use the custom data in the store listing template, or the wpsl_info_window_template filter if you want to use it in the info window template.
In this code example, the “appointment_url” data is included in the store listing template and placed below the location details:
Make Meta Data Clickable
In case the new meta data contains a phone number or email address, and you’d like to make it clickable, then replace line 20 – 22 of the above code with one of the code snippets below. Do replace the name of the field ( extra_phone or extra_email ) with the name of your own new meta field.
The <% ... %> and <%= ... %> code is used by the Underscore library to execute JS code, and to print the correct JSON data when the HTML template is rendered.
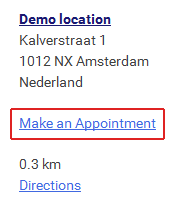
Reload the store locator page, and if the “appointment_url” data exist the “Make an Appointment” link is shown.
If the changes you made don't show up on the frontend, then make sure to flush the store locator transient cache. You can do this on the settings page.
By using our website, you agree to our use of cookies in accordance with our privacy policy.