WP Store Locator fully supports internationalization (i18n) and is compatible with WPML, one of the leading multilingual plugins.
The translation files are located in the /wp-content/plugins/wp-store-locator/languages folder. But if you want to create your own translation files, then it’s recommended to create a wp-store-locator folder inside /wp-content/languages, and save the new translations there.
Download existing translation files
You can check if a community created translation exist on this page.
If this is the case, then click on your language and on the following page click on the ‘Stable (latest release)’ link. Scroll down to the bottom and click on ‘export’ to download the language file.
Move the downloaded file to the /wp-content/languages/wp-store-locator folder on your server. If the language in WordPress itself matches with the downloaded file, then the store locator should show the translations.
Create translation files
There are different tools available that can help you create new translation files. In this example, we will use Poedit, an open source program available for Windows, Mac OS X, and UNIX/Linux.
- Install Poedit.
- Go to File > New from POT/PO file, and select the wpsl.pot from the /wp-content/plugins/wp-store-locator/languages folder.
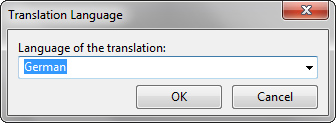
- Select the language of the translation in the “Translation Language” box.
- Save the translation in /wp-content/languages/wp-store-locator.
You do need to follow a specific naming convention for the translations to work. It starts with wpsl- followed by the ISO-639 language code and the ISO-3166 country code. So if you, for example, want to create a German translation, then you need to save the file as wpsl-de_DE.po.
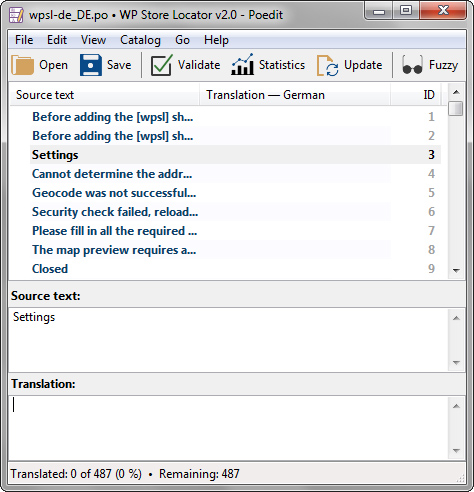
- You can start translating by selecting a text string in the top box, adding the translation in the “Translation:” box at the bottom, and saving the changes.
- When your done with the translation go to File > Compile to MO in Poedit. Both the .po and .mo files are required for the translation to work.


WPML multilingual setup
To get started with WPML, you first need to purchase the Multilingual CMS package and install the different modules.
String translation
Open the WPML -> Theme and plugins localization page, scroll down to the “Strings in the plugins” section, check the WP Store Locator check box, and click “Scan the selected plugins for strings.”
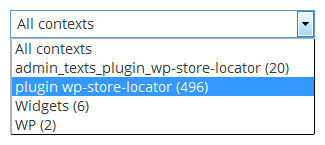
When the scan is complete, open the WPML -> String Translations page and select plugin wp-store-locator or admin_texts_plugin_wp-store-locator from the “All contexts” drop down.
Look for the string you want to translate, click on “translations” to open the editor and fill in the different translations.
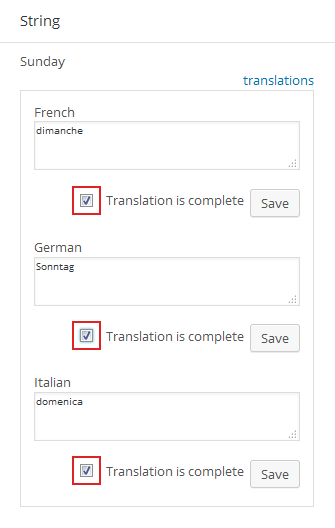
When you’re done, make sure to select the Translation is complete checkbox before saving the translations; otherwise, they will not appear in the store locator.
Translate the store pages
Before you can translate the store pages, you first need to enable the option on the WPML -> Translation management page.
Look for the “Custom post types” section near the bottom of the page, select “Translate,” and save the page.
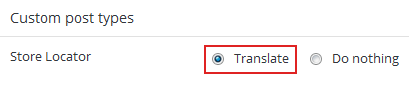
Once you have done that, go to Store Locator -> All Stores, and add the translations for the available languages.
You can change the available languages on the WPML -> Languages -> Site Languages page.
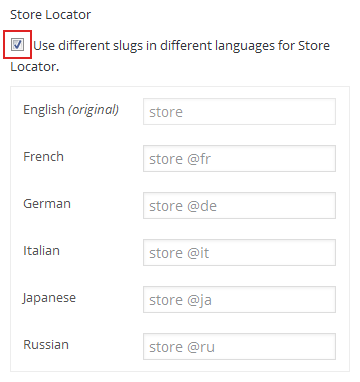
Permalink translation
Open the WPML -> Translation management -> Multilingual Content Setup page, look for the Custom posts slug translation section, select the check box and save the page.
![]()
Scroll down to the Custom posts section, select the checkbox below Store Locator and fill in the permalink translations.
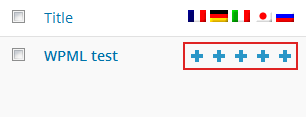
Translate Store Categories
Go to the WPML -> Translation management -> Multilingual Content Setup page and look for the Custom taxonomies section. Select “Translate” after “Store Categories” and save the page.

Open the WPML -> Taxonomy Translation page and select “Store Categories” from the dropdown list. This will show a table where you can create translations for the different store categories.
Notes
If the locations are only translate for logged in users, then make sure to enable the language cookie option.