Installation
- Download the zip file mentioned in the WPSL receipt.
- Log into your WordPress Admin area and go to Plugins > Add New.
- Click Upload Plugin on the top of the page.
- Select the zip file you downloaded in step 1.
- Click Install Now.
- Once the installation is complete, activate the plugin.
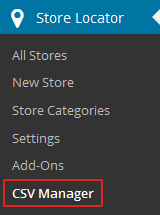
You can access the CSV Manager in the Store Locator menu.
Activate License
You can find your license key in your purchase receipt, and in the ‘License Keys’ section on the account page.
Activate your license on the WPSL settings page under the ‘Licenses’ tab.
Import
Using the CSV headers from the list below will guarantee that the data from the CSV file is automatically mapped to the corresponding WPSL fields.
You can use different CSV headers if you’d like, but then you will have to manually adjust the field mapping after uploading the CSV file.
| CSV Header | Description |
|---|---|
| wpsl_id | The ID WordPress assigned to this location.
A new location is created if this field is left empty. If you do provide an ID, and it belongs to an existing location, then it will update the data. But if no matching location is found, then it will skip the data and show an error. |
| name
Required header |
This is used as the post title.
Example: Apple Store, Grand Central. Required value |
| description | The post content. |
| excerpt | The post excerpt. |
| address
Required header |
45 Grand Central Terminal
Required value |
| address2 | 46 Grand Central Terminal |
| city
Required header |
New York
Required value |
| state | NY |
| zip | 10017 |
| country | United States |
| country_iso | A two letter ISO 3166-1 country code.
Example: US. |
| lat | If this field is left empty, a request is made to the Google Maps Geocoding API to get the coordinates.
Example: 40.7527262. |
| lng | If this field is left empty, a request is made to the Google Maps Geocoding API to get the coordinates.
Example: -73.9772294. |
| phone | (212) 284-1800 |
| fax | (212) 284-1800 |
| info@email.com | |
| url | https://www.apple.com/retail/grandcentral/ |
| hours | The opening hours.
The default hours set under Settings > Store Editor are used if this field is left empty. If the opening hours are entered through dropdowns, and you want to use something different other than the default hours from the settings page, then you need to follow the following formats. 24 hr format 12 hr format |
| image | The ID of an existing Media Library image, or the URL of the image that you want to use.
If you want to use the same image for all locations, then instead of importing the same image over and over again, it’s more efficient if you manually upload the image to the Media Library, get the ID of the uploaded image, and include that in the CSV file. This way all locations will use the same image from the Media Library. You can find the ID of the uploaded image by opening it in the Media Library and look for this part in the browser bar, upload.php?item=. The number behind ?item= is the number you need to use in the CSV file to make sure all location use the same image. Note: Importing large amounts of images from an external URL can significantly slow down the import process. |
| category | The name of the category you want to assign the location to.
Example: “my category”, or if you want to assign the location to multiple categories, then you need to separate them with a “|”. So you get “my category|my category b|my category c”. |
| status | Defaults to “publish” if left empty. Other values are “draft”, “pending”, “future” and “private”. |
| permalink | The slug of your post. If this field is left empty, then the slug is automatically generated based on the value from the “Name” field. |
| author | The user ID of the author. Defaults to the user ID of the current user if left empty. |
| date | The time the post is created in the Y-m-d H:i:s format ( for example 2016-12-31 10:00:00 ). The current time is used if left empty. |
Custom Fields
If you used the wpsl_meta_box_fields filter to add custom meta box fields, and you’d like to import data for those fields, then you can do this by using the name of the meta box field as the CSV header.
So, if you for example look at the usage section, and you want to import data for the my_textinput field, then you need to set the CSV header to my_textinput as well.
Upload File
Go to Store Locator > CSV Manager, click the “Browse” button to select the file on your computer, followed by “Upload File” to move the CSV file to your server.

Once the file is uploaded, you will have the option to adjust the field mapping.
Field Mapping
If the CSV headers match with the names of the WPSL fields, then they are automatically mapped to the correct field. But if this is not the case, then you can adjust the field mapping before starting the import process.
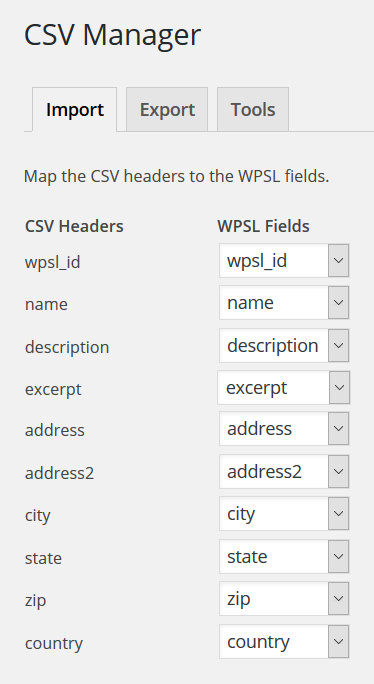
When you’re satisfied with the mapping, click Import Locations.
Export
You can export your locations to create a backup, use it to bulk edit the data in your favorite CSV editor, or move the data to a new site.
The default CSV export always contains all the location data. But if you want to export a specific selection, then you can do this by using the export filters. They enable you to export the data by category, city or country.
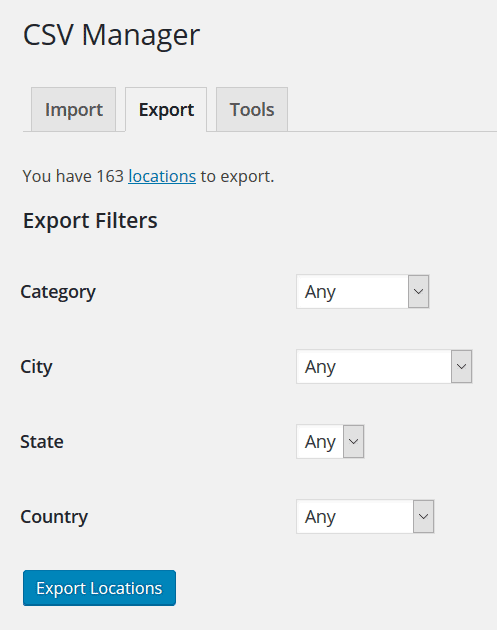
Custom Filters
If you want to add additional export filters, so you can for example filter the export data by state, then you can do this by using the wpsl_csv_export_meta_filters and wpsl_csv_export_args filters.
Update Locations
You can bulk update your locations by first exporting the existing data on the export page, make the changes you want, and re-import the updated CSV file.
If the provided id doesn’t belong to a store location, then a warning is shown and the row is skipped.
Delete Locations
The easiest way to delete all locations is by using the ‘Delete All Locations’ option on the ‘Tools’ tab in the CSV Manager.
Delete a Specific Group of Locations
If you’d like to delete a specific group of locations, then you can do this by following the next steps.
- Create an export on the CSV Manager -> Export page.
- Open the file in your spreadsheet editor and delete the locations you want to keep. So the only locations left in the CSV file should be those you want to delete.
- Remove all data from all the columns except for the wpsl_id fields ( do keep the column names ).
- Upload this file on the CSV Manager -> Import page.
After the upload it should say ‘Removed x locations’.
Notes
Always use UTF-8 Encoding
Using UTF-8 encoding makes sure no unwanted special characters are included in your CSV file, and that the imported data isn’t rejected by the Google Geocode API.
If the imported file does contain data that’s not UTF-8 encoded, then an error 400 Bad Request message is returned.
You can set the used character encoding in the save dialog of the used spreadsheet editor, or try to import your CSV file in a Google Docs Spreadsheet, go to File > Download as > Comma-separated values, and try to import the downloaded CSV file again.
Recommended CSV Editors
If you need to create a new CSV file, then you can do this with Google Docs Spreadsheets or OpenOffice.
Geocoding Limit
If the lat or lng fields are left empty in the CSV file, then a request is made to the Geocoding API to convert the address into a set of coordinates.
To prevent abuse from Google’s resources, access to the Geocoding API is restricted to 2,500 free requests per IP each 24 hrs. When you’ve reached this limit the Geocode API will return an OVER_QUERY_LIMIT error.
If you repeatedly see this error, then the easiest solution is to increase your quota by generating a Server API key and enable billing.
Once billing has been enabled, if you exceed 2,500 requests in a day, you will be billed at $0.50 USD / 1000 additional requests, up to 100,000 daily.
Once you have a server API key you can set it on the settings page in the “Google Maps API” section.
It’s possible you’ll see the OVER_QUERY_LIMIT error before geocoding 2,500 locations a day. If this is the case, then you’re probably on a shared hosting plan, and other sites sharing your IP have already used up most of the allowed 2,500 free request. The daily geocode quota is reset at midnight, Pacific Time.
An alternative solution is to use a third–party service to handle the Geocoding for you. So when you import the CSV file, all the coordinates are already known, and no additional request to the Google Geocode API are required.
Importing a CSV file where the coordinates are provided is much faster than without them.
Required Fields
The name, address and city fields cannot be empty. If they are, then the row is skipped.
Troubleshooting
The first thing you need to determine if the CSV import fails is if it happens because of a conflict with your installation, or if it’s caused by the used CSV file.
You can test this by importing the sample file, and see if it works without any issues.
The Sample File Import Fails
If the import of the sample file also fails, then there is likely a conflict with your installation that prevents the CSV Manager from working correctly.
First try to disable all other plugins before importing the CSV file again. If this solves the problem, then enable the other plugins one by one until you found the one that causes the conflict.
If the problem is indeed caused by a conflict with another plugin, then let me know which plugin it is, and I will look into why it happens.
You can also check the server error logs, and enable WP_DEBUG and WP_DEBUG_LOG in the wp-config.php.
Once you’ve enabled debug mode in WordPress, try to import another CSV file and check the /wp-content/debug.log file on your server for any errors that happened around the time you tried to import the CSV file.
If you require further assistance then please submit a support ticket.
Only My Own CSV File Fails to Import
If importing the sample file works fine, but your own CSV file fails, then make sure the required name, address and city fields contain data, and that the CSV file is saved with UTF-8 encoding.
Error Messages
-
Invalid date or Whoops, the provided date is invalid
This error shows up when the date in the CSV file doesn’t use the Y-m-d H:i:s ( 2001-03-10 17:16:18 ) format.If your importing an updated file, and didn’t change this yourself, then the spreadsheet editor may have changed the format. In that case setting the date field to unmapped on the mapping page will solve it.
-
Could not insert post into the database
This happens when the imported data isn’t UTF-8 encoded.You can fix this by saving the file in your favorite editor with UTF-8 encoding, or import the data in Google Spreadsheets, export it again as a CSV file, and then import it through the CSV Manager.
-
Content, title, and excerpt are empty
This error message is returned by WordPress when the data for the content, title and excerpt fields are empty.You can fix this by making sure that all locations have a store name set in the CSV template.
-
Update failed! The provided wpsl_id doesn’t belong to a store location
When you import a CSV file with data in the wpsl_id fields, but those values don’t belong to an existing location, then this error shows up.If you are planning to update the location data, then make sure the ID values belong to existing locations. Otherwise you either have to leave the wpsl_id field empty in the CSV file, or set the wpsl_id field to unmapped.
If it’s set to unmapped, then the values from the wpsl_id fields are ignored during the import and no error will show up.
-
500 Internal Server Error
This is a generic error message that can happen for different reason. The only way to find out exactly why it happens is by checking the error logs on your server.Usually you can access them through the control panel on your host. But if you have trouble locating them, then ask your host if they can see why the 500 error was triggered.
-
Allowed memory size of xxxxxxx bytes exhausted
The reason this error shows up is because WordPress exceeded the memory limit set on your server.You can try to raise the memory limit yourself by adding the code below to the wp-config.php. But if this has no effect, then you have to ask your host if they can raise the memory limit for you.
An alternative solution is to split your CSV file into several smaller files, and import them one by one.
-
Maximum execution time of xx seconds exceeded
This means that the import script required more time to process the data then allowed by the server.The reason servers set a max execution time is to prevent abuse from the available resources. The CSV Manager does try to disable the max execution time, but this isn’t always allowed.
You can either try to raise the max execution time yourself, or ask our host to do it for you.
If after raising the max execution time you still get the error, then try to split the CSV file into smaller files, and import them one by one.
-
The Google Geocode API reported the following problem: error 400 Bad Request
This error shows up when a special character in your data is incorrectly encoded and is turned into for example a character like � or ….To fix this make sure the uploaded CSV file uses UTF-8 encoding.
You can often specify the used character encoding when you save the CSV file in your spreadsheet editor.
You can also try to import your CSV file in Google Spreadsheets, export it, and then import it again in the CSV Manager.
If you require further assistance then please submit a support ticket.